4th Degree Beret - SHAPING & WEARING of the Beret
BASIC INSTRUCTIONS
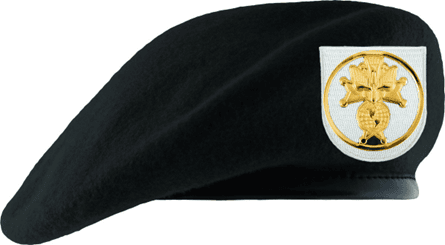
Official Fourth Degree Black Unlined Beret with Fourth Degree metal badge to be worn over the left eye.
Preparing the Beret.
Berets are not designed to be worn off the rack. They must first be shaved and shaped to present the sharpest form and fit befitting the Fourth Degree image. There are several methods for achieving the proper beret shape. If you are new to shaping your beret, seek out advice from experienced Sir Knights to avoid damaging your beret. The method detailed below is common and not difficult. The entire process can take one to two days to complete, allowing time for the beret to dry after shaping. Make sure your beret is the right size before getting it wet, as the material stretches when it is damp. Note: If your beret comes with a liner (not all berets will have a liner), remove the liner by cutting it out.
What You Will Need:
• Disposable Razor
• Hot Water
A. Shave Your Beret
1. Using a disposable razor, shave your beret, beginning at the center and shaving toward the outer edge in circular motions, until you have a very smooth surface. (Some people use a cigarette lighter to burn off the fuzzies). Be careful not to shave the same spot multiple times as this will wear the material thin and may create a hole.
2. Turn the beret inside-out and shave the inside of the beret as well. You may have to change your razor if it becomes dull—you don’t want to accidentally cut your beret’s material.
B. Trim Tag and Fit Your Beret
1. Cut the tag off below the beret size lettering. You’ve done it right if, when you put the beret on, the tag can never show even if it gets flipped over.
2. Pull the headband drawstring tight and tie it off in a square knot. DO NOT CUT IT YET!
C. Shape Your Beret
1. Dunk your beret in warm water—do not use hot or boiling water, as this can cause the wool to shrink.
2. Once your beret is damp and pliable (if it is dripping wet, gently wring out excess water), place the damp beret on your head. Adjust it to proper fit.
3. Pull the cardboard stiffener so it is centered over your left eye and smooth the material over your head. Fold the extra material over to the right forward side of your head, pulling it down towards your right ear. It should just touch your ear or go just below that.
4. Once you’ve got it all set, wear the beret for a while until it has begun to dry.
5. Carefully take off the beret and set it aside to finish drying. You may need to shape it a few times to get it right.
6. Once you’re happy, cut the excess drawstring off and get your flash sewn on.
D. Tips for a Better Beret Shape
1. Don’t skip shaving the inside of the beret—unless you like pulling fuzzies out of your hair.
2. If your beret is too big, you can shrink the material by doing what was not recommended above: use hotter water when you soak it.
ADVANCED/DETAILED ADVICE:
1. Cut out the liner, cutting around the cardboard, leaving it intact. The cardboard is where you will attach your Fourth Degree emblem and perhaps "flash." The flash is the colored shield designating your former cape color. They come directly from Supreme. Red capes have no flash. FN, PFN, CCC must order them (no cost). Cutting out the liner will lighten the weight of the beret. If you buy a spare beret from a military surplus store, there should be no liner. The liner makes the beret hotter and also harder to form.
2. Shave, yes, shave your beret, inside and out. Put it over your knee and work from the center out. This also lightens the weight of the wool and makes is easier to form. Plan on using at least two disposable razors on the inside and two on the outside. There are several You-Tube videos and numerous suggestions available. Let me know if I can help. Again, put the beret over your knee and shave it, from the center to the outside. (COMMENT: Do this outside and you won't have as much cleaning up.) Reverse the beret and do the same. You are lightening the weight of the wool so you can form it better.
3. With no flashes or emblems attached, soak the beret in hot water. Put it on and form it (looking in the mirror) to look like image above. Wear it until it dries. I repeat, Plan ahead.
4. Draw the string in the band snug. Tie a square knot, not too tight. Do not cut the ends of the ribbon or tie them in a bow. Use a pen cap or blunt, narrow tool to insert the ends of the ribbon back into the leather band that holds the adjustment ribbon. If your hair style (long, short) changes, you can adjust the fit of your beret if you haven't cut the ribbon.
5. Your flash/badge should line up over your left eye. Suggest you not sew your colored flash to your beret. The Fourth Degree emblem badge (Holy Spirit descending) will hold the flash in place. Due to the angles of a well formed beret, the flash and the badge should be adjusted to be horizontal, level.
6. The beret should drape over your right ear, covering no more than half the ear. Do not, insert the keepers on your Beret until everything is done to it (soaking, shaving, removing the lining and etc.).